Guide
How to use Macro Hub
Everything in the app, one step at a time. Every chapter has its own animations: watch what happens as you read.
The animations are simplified drawings of the app. Button and menu names are the real ones: you'll find them exactly the same in Macro Hub.
First launch
The opening, the guided tour inside the app, your first macro “Ciao”, your code and the free trial.
Install
Download the installer from macrohub.it and open it. Choose your language and follow the steps: no administrator rights needed. If Windows shows “Windows protected your PC”, click “More info” and then “Run anyway”.
The opening
Every time the app opens, a sphere of colored dots takes shape and opens onto the app. It lasts a couple of seconds; if you're in a hurry, a click or a key skips it.
The guided tour inside the app
The first time, once the opening is over, a short tour starts. It doesn't just have you read: it has you do the real thing with your first macro, “Ciao”, which types “Ciao”.
- Click the pin on “Where it works” and choose “Example”, the profile that works in any program.
- Turn on the switch in the “Example” profile.
- Open Notepad and press F8: the macro types for you.
- Then the tour points out “New macro”, Devices, Community and Settings.
 Macro Hub
Click the pin and choose “Example”.
Do it for meTurn on the switch in the “Example” profile.
Do it for meOpen Notepad and press F8: the macro types for you.
Do it for me- “Ciao” is your first macro. It doesn't have a place yet: the pin is yellow.
- Click the pin and choose “Example”: it works in any program.
- In the “Example” profile, turn on the switch.
- Open Notepad and press F8…
- …and the macro types “Ciao” for you.
Your Macro Hub Code
On first launch, Macro Hub creates your Macro Hub Code by itself. No sign-up: no email or password, and the code contains no data about you or your PC. It's used for the Pro license, the Community and the macros you buy. Keep it safe with the recovery code: the Settings chapter explains how.
The free trial
If your PC is connected to the internet, a 7-day trial with every Pro feature starts on first launch, with nothing to enter. Without internet you use the Free version, and the trial starts the first time Macro Hub connects.
The main screen
The menu on the left, the box with your version, the bar at the top and the icon next to the clock.
The menu on the left
Five items, always there:
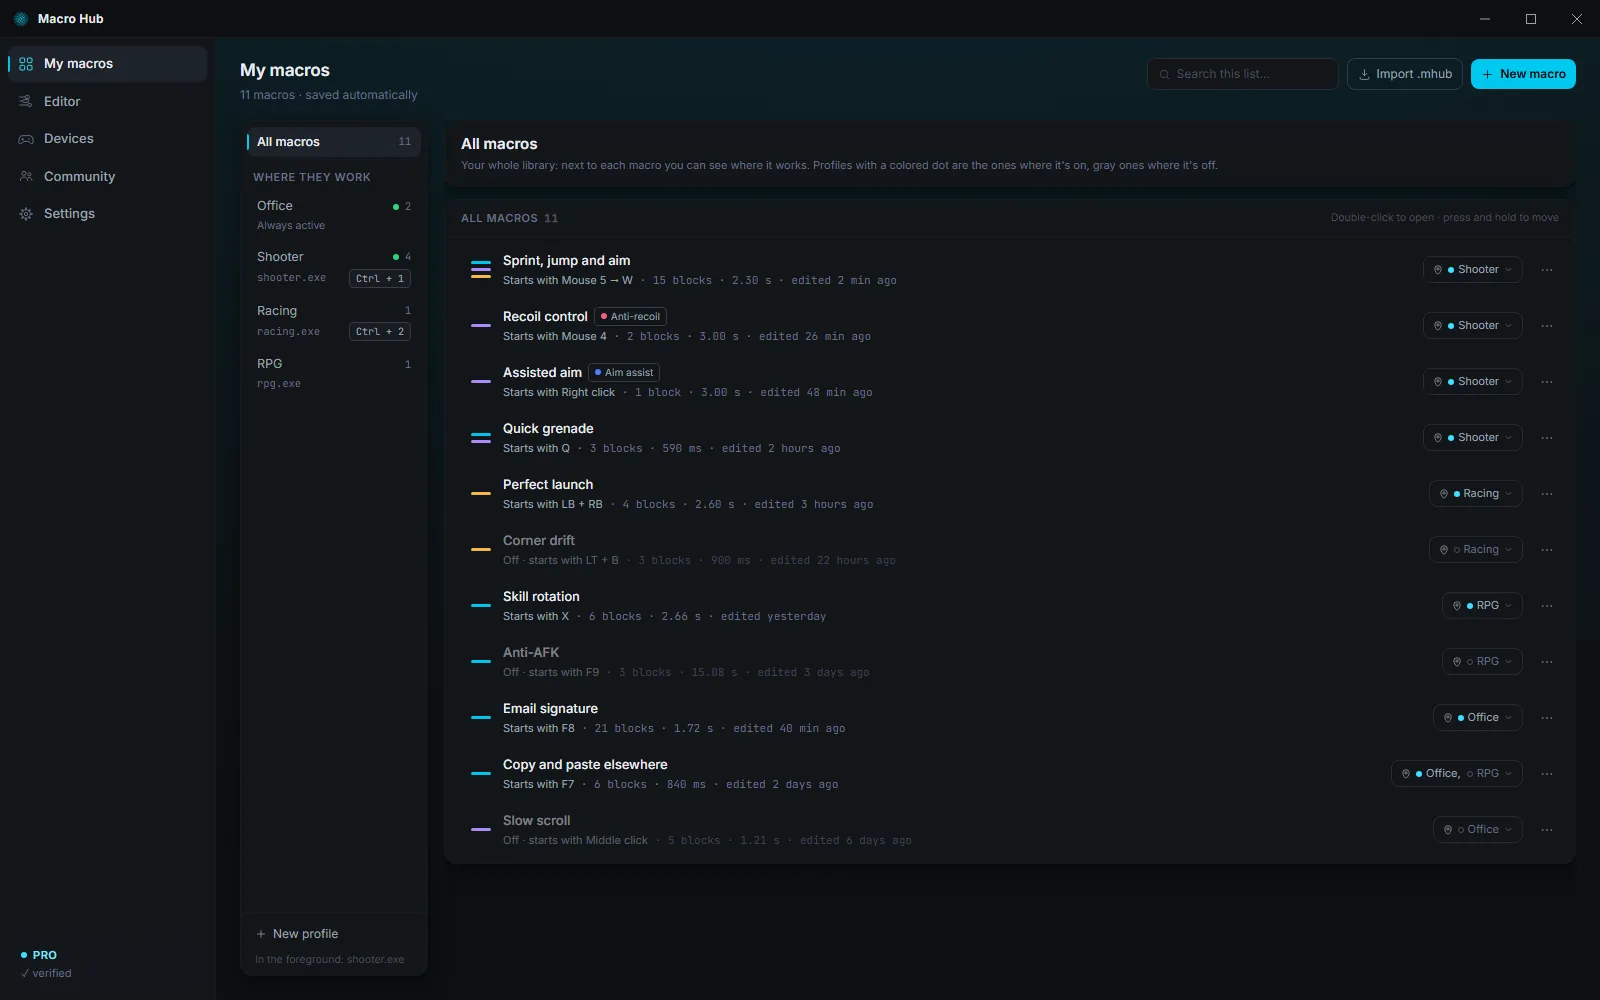
- “My macros”: all your macros and the profiles where they work.
- “Editor”: the open macro, on the timeline. While you work on it, “Anti-recoil” and “Aim assist” appear below it: the pages for those two blocks.
- “Devices”: controllers, keyboard and mouse, to test and remap.
- “Community”: macros made by others to download, and yours to publish.
- “Settings”: language, license, emergency stop, updates and your code.
Macro Hub- “My macros”: your macros and profiles.
- “Editor”: the macro on the timeline. Below it, “Anti-recoil” and “Aim assist”.
- “Devices”: controllers, keyboard and mouse.
- “Community”: macros to download and to publish.
- “Settings”: language, license, safety and the rest.
- At the bottom, your version: Pro, free trial or Free.
The box at the bottom
At the bottom of the menu you see your version: “Pro”, “Free trial” with the days left, or “Free version” with how many macros you have on. The button below it (“Upgrade to Pro”, “Activate license” or “Renew license”) takes you to Settings.
The bar at the top
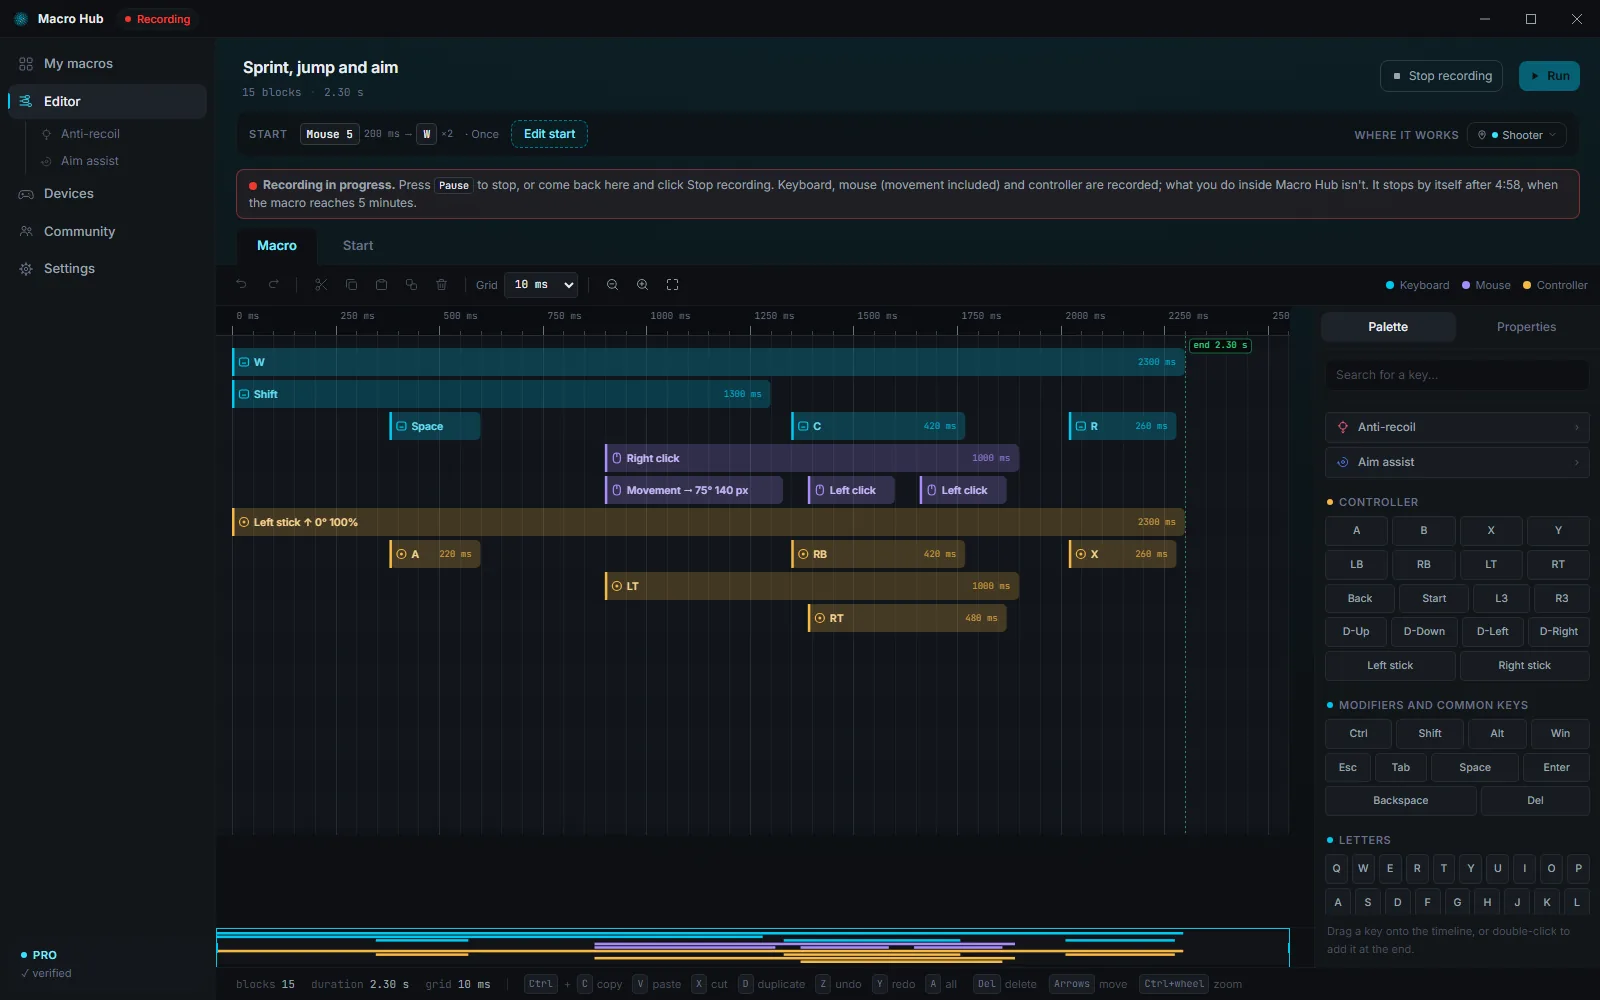
While a macro is running, “Macro running · Ctrl + Alt + Esc stops everything” appears next to the app's name; while you record, “Recording”. So you always know what's going on, from any page.
Next to the clock
The X at the top right doesn't close Macro Hub: it hides it next to the clock, and macros and remapping keep working. A click on the icon brings it back. Right-click it to open the menu: “Open Macro Hub”, “Stop all macros” and “Quit”, which really closes it.
Macro Hub12:00- The X doesn't close Macro Hub: it hides it next to the clock.
- Meanwhile, macros and remapping keep working.
- Right-click the icon: the menu.
- “Open Macro Hub”, or a click on the icon, brings it back. “Quit” closes it.
My macros
The list of your macros: where they work, on or off, their order, and everything you can do with them.
What you see
The column next to the menu chooses what you're looking at:
- “All macros”: your whole library, with where each macro works shown next to it.
- “Not assigned”, in yellow: macros that don't have a place yet. They don't start anywhere until you choose where. It only shows up if there's at least one.
- Under “Where they work”, your profiles. The number tells you how many macros are on there; the green dot means “active now”.
A macro at a glance
- The colored bars on the left show what it uses: light blue for the keyboard, purple for the mouse, yellow for the controller.
- Under the name, how it starts: “Starts with F8”. If it's off, “Off · starts with F8”; with no start, “No start”.
- Next to the name, the labels: “Anti-recoil”, “Aim assist”, “Protected”, “Downloaded”, and “running” while it runs.
- Then how many blocks it has, how long it lasts and when you last edited it. Macros save automatically.
Where it works: the pin
Every macro has the button with the pin, “Where it works”. Click it and check the profiles where it should work, even more than one. “Not assigned”, at the top, removes it from all of them.
In the button, each profile has a dot: colored where the macro is on, gray where it's off. A newly added profile arrives off.
Macro Hub- A macro with no place is “Not assigned”: it doesn't start anywhere.
- Click the pin on “Where it works”.
- Check the profiles where it should work, even more than one.
- The gray dot says it's still off there.
On or off, profile by profile
The switch is there when you open a profile, and it only applies there: the same macro can be on in “Office” and off in “Shooter”. A macro's start only works where the macro is on, and only while that profile is active. In “All macros” there's no switch: the dots on the pin tell you where it's on.
Macro Hub- Inside a profile, the switch only applies there.
- In “Shooter” the same macro is off.
- Turn it on here: in “Office” it stays as it was.
- In “All macros”, the dots tell you where it's on.
New macros
“New macro”, at the top, opens the editor with an empty macro. If you create it while looking at a profile, it goes there, already on; if you create it from “All macros”, it goes to Not assigned, turned off. Inside a profile, “Add macro” creates a new one or adds one of yours, which arrives off there.
Open, search, reorder
- Double-click a macro (or press Enter) to open it in the editor.
- Press and hold a row and drag it to change the order: a line shows you where it will land. The order applies to every list. With the keyboard: Alt + Up or Down arrow.
- “Search this list...”, at the top, finds a macro by name or by start key.
Macro HubMacro Hub- Press and hold a macro…
- …drag it: the line shows where it will land.
- Let go: the order applies to every list.
- Double-click: the macro opens in the editor.
The “…” menu
The three dots to the right of each macro (“More actions”) hold the rest:
- “Open”: in the editor, like a double-click.
- “Duplicate”: a copy, with “(copy)” in its name and the same places.
- “Export”: saves the macro to a .mhub file, to keep or to pass on to anyone you like. Protected macros can't be exported.
- “Remove from this profile”: there when you're looking at a profile. If the macro is left with no place, it moves to Not assigned.
- “Delete”: asks “Delete?” first.
Macro Hub- The three dots open the other actions.
- “Duplicate” makes a copy.
- “Export” saves it to a .mhub file.
- “Delete” asks first.
Importing a .mhub file
“Import .mhub”, at the top, reads a macro file. A .mhub is just a list of keys and timings, never a program. The imported macro arrives off and not assigned: look at it in the editor, then choose where it works and turn it on. If it had a start, Macro Hub shows it to you the first time you turn it on.
Macro HubMacro Hub- “Import .mhub” and choose the file.
- The macro arrives off, in “Not assigned”.
- Look at it in the editor, then choose where it works.
The editor
The timeline: blocks, palette, grid, zoom and exact values down to the millisecond.
Every key is a block
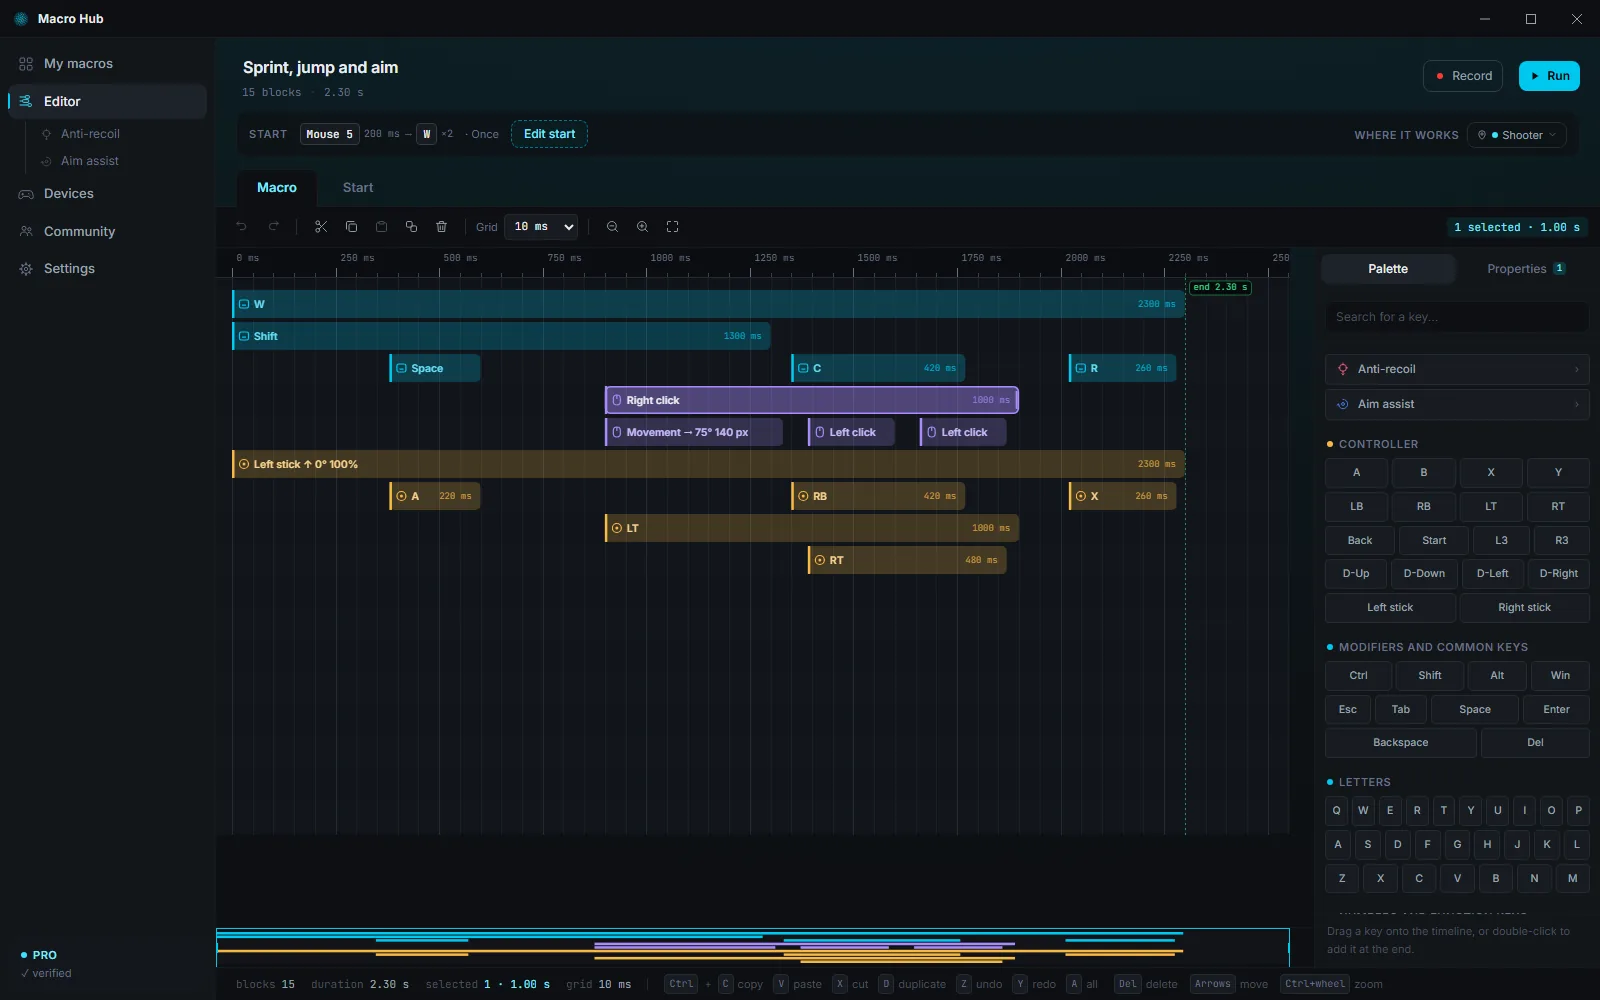
In the editor, the macro is a timeline that runs from left to right. Every key, button or movement is a block: where it starts, the key goes down; the longer it is, the longer the key stays pressed. Keys pressed together sit one under the other, on different rows.
The color tells you what kind it is: light blue for the keyboard, purple for the mouse, yellow for the controller, red for anti-recoil, blue for aim assist.
- Where the block starts, the key goes down.
- The longer it is, the longer it stays pressed.
- Two blocks one above the other: two keys pressed together.
At the top
- The macro's name: click it to change it. Below it, how many blocks it has and how long it lasts.
- “Record” and “Run”: you'll find them in the next chapters.
- The “Start” row sums up how the macro starts; “Edit start” (or “+ Create start”) takes you to the “Start” tab.
- On the right, “Where it works”: the same pin as in My macros.
- The “Macro” and “Start” tabs: the timeline and the way the macro starts.
Adding a key
On the right is the “Palette”: keyboard keys, mouse and controller buttons, the sticks and, at the top, “Anti-recoil” and “Aim assist”. Drag a key onto the timeline and drop it wherever you want; double-click it to add it at the end. “Search for a key...” finds it by name.
- Grab a key from the palette…
- …and drop it on the timeline, wherever you want.
- Pull the right edge: it stays pressed longer.
- Double-click a key: it's added at the end.
Move, stretch, select
- Drag a block to move it in time, or up and down onto another row.
- Drag its right edge to make it longer or shorter.
- Click a block to select it. Shift + click adds more; dragging over an empty space selects them all in a box.
- The left and right arrows move the selected blocks by one grid step; with Shift, by ten steps.
- Del deletes them; Ctrl + Z undoes.
- Drag a block to move it in time.
- Up or down moves it to another row.
- The arrows move it one step; with Shift, ten.
- Drag over an empty space: select several blocks in a box.
- Ctrl + C copies, Ctrl + V pastes at the end.
- Del deletes; Ctrl + Z undoes.
The grid
“Grid”, in the bar above the timeline, sets the step that blocks snap to: 1, 5, 10, 50 or 100 ms. At 10 ms a block goes to 0, 10, 20 ms and so on; for finer timing, choose 1 ms.
- At 10 ms the block snaps every 10 ms.
- At 1 ms you place it wherever you want, to the millisecond.
- At 100 ms it jumps 100 at a time.
The toolbar
From the left: “Undo” and “Redo”, then “Cut”, “Copy”, “Paste at the end”, “Duplicate” and “Delete”; then the “Grid”, “Zoom out”, “Zoom in” and “Fit the whole macro”.
Zooming and scrolling
Ctrl + wheel zooms around the pointer; the wheel alone scrolls the timeline; you can also drag it with the middle mouse button. At the bottom, a thin strip shows the whole macro in miniature: drag the rectangle or click a spot to go there.
- Ctrl + wheel: zoom around the pointer.
- The wheel alone scrolls the timeline.
- “Fit the whole macro” shows all of it.
Exact values: Properties
Dragging is handy, but sometimes you need exactly 16 ms. Select a block and open the “Properties” tab, next to “Palette”: there you type the “Start” and “Duration” in milliseconds. With several blocks selected you can move them together and give them all the same duration.
- Select a block and open “Properties”.
- Type the exact “Duration”, in milliseconds.
- And the “Start”: the block goes right there.
Mouse movements and sticks
Moving the mouse is a block too: “Movement”. In Properties choose the “Direction” (click in the circle: 0° is up, 90° right), the “Distance” in pixels and the “Speed”: “Steady”, “Speed up” or “Slow down”. In games it turns the view; meanwhile you can move the mouse, and the movements add up.
- “Direction”: click in the circle. 0° is up, 90° right.
- “Distance”: how many pixels the mouse moves.
- “Speed”: steady, speeding up or slowing down.
Less mechanical Pro feature
“± random”, in Properties, varies the block's start and duration by that amount on every run: the macro looks like it's done by hand.
- “± random”: choose a margin, for example 20 ms.
- On every run, start and duration change slightly.
Limits
A macro lasts at most 5 minutes and has at most 5000 blocks. On “Loop” it starts over endlessly, so 5 minutes is enough for almost anything.
Recording a macro
Do once what you want to repeat: Macro Hub turns it into blocks.
How to do it
- In the editor, press “Record”.
- A 3-second countdown starts: switch to the window you want to record in.
- Do what you usually do, with the keyboard, the mouse (movements included) or the controller.
- Press Pause to stop, or go back to Macro Hub and click “Stop recording”.
- The recorded blocks appear at the end of the macro, already selected: fine-tune them as you like. If you don't like them, Ctrl + Z removes them.
Macro HubRecording- Press “Record”.
- You have 3 seconds: switch to the window to record in.
- Do what you want to repeat: keys, clicks, movements.
- Press Pause: the blocks land at the end of the macro.
- They're already selected: fine-tune them, or remove them all with Ctrl + Z.
What gets recorded and what doesn't
- What you do inside Macro Hub isn't recorded: clicking “Stop recording” doesn't end up in the macro.
- A key held down becomes a single long block, not lots of repeated presses.
- The Pause key stops the recording and doesn't end up in the macro.
- Mouse movements become “Movement” blocks.
- Recording stops by itself when the macro reaches 5 minutes.
- A key held down becomes a single long block.
- Three quick taps become three short blocks.
Trying the macro: Run
Try the macro whenever you like, even when it's off: it starts after 3 seconds and runs once.
How to do it
- Press “Run”.
- You have 3 seconds to switch to the window where you want to try it, for example Notepad.
- The macro runs once, from start to finish. Meanwhile the button becomes “Stop”.
“Run” is for trying: it works even with the macro off or not assigned. To really use it, give it a start: that's the next chapter.
Macro HubMacro running · Ctrl + Alt + Esc stops everything4- Press “Run”: you have 3 seconds to switch to the right window.
- The macro runs once: each block presses its key, at its own time.
- While it runs, “Run” becomes “Stop”.
- Done: everything goes back to how it was.
If something doesn't get through
- “Windows rejected the input”: this happens when the program in the foreground runs as administrator and Macro Hub doesn't.
- Controller blocks only work with the virtual controller on, on the Devices page: if it's missing, the app tells you.
- Try it in Notepad first: if it works there but not in the game, the game might not accept keys pressed by a program.
How a macro starts
A key, a combination, a mouse or controller button: once, on a loop or for as long as you hold it.
Where to set it
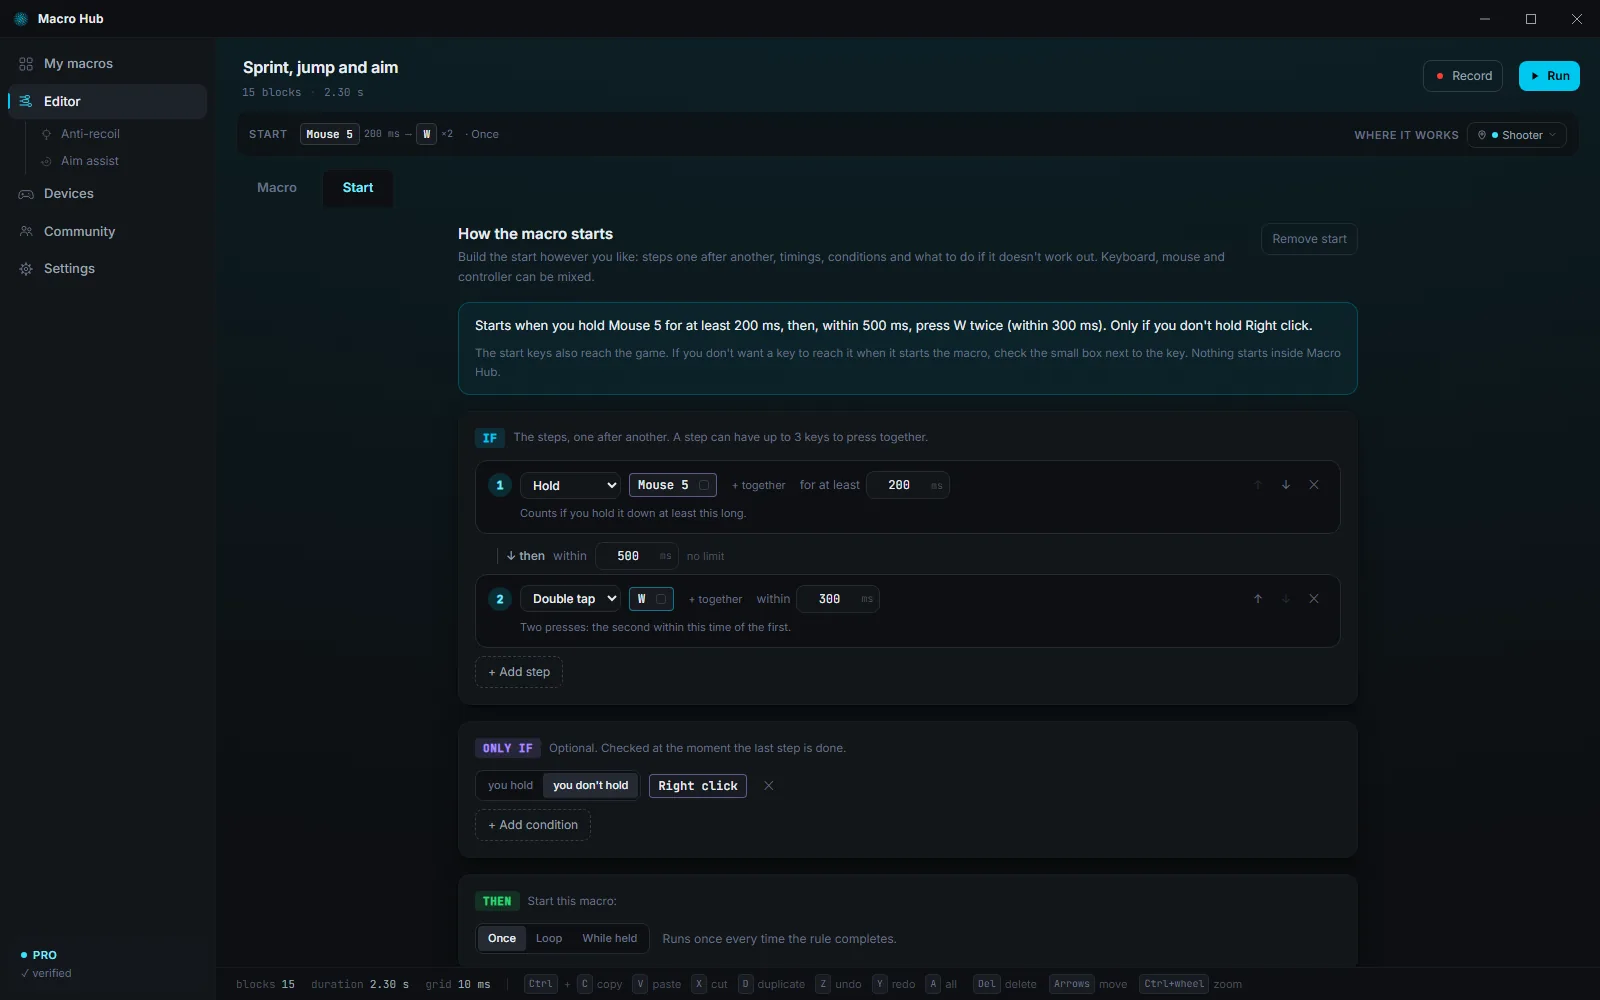
In the editor, open the “Start” tab, or click “Edit start”. At the top, the rule is written out in words, for example “Starts when you press F8.”: you can check it at a glance. “Remove start”, at the top right, removes it: the macro stays, but it only starts with “Run”.
Choosing the key
- In step 1, click “Choose the key”.
- Press the key you want, or click in the box with the mouse button you want to use, even Mouse 4 or Mouse 5. With Pro, a controller button or a stick pushed all the way works too.
- For a combination, “+ together” adds another key: up to 3 pressed together, for example Ctrl + F8.
Press a key or a controller button, push a stick all the way, or click here with the mouse button you want to use.
- Click “Choose the key”.
- Press F8: there's your start.
- “+ together” for a combination, like Ctrl + F8.
Once, on a loop, while held
In “Then” choose how the macro runs:
- “Once”: it runs once, every time you press.
- “Loop”: it starts over by itself, endlessly; press the key again to stop it.
- “While held”: it keeps going as long as you hold the key down, and stops when you let go.
- “Once”: press, and the macro runs once.
- “Loop”: it starts over by itself; press again to stop it.
- “While held”: it runs as long as you hold the key down.
The key reaches the game too, if you want
Normally the start key also reaches the program or game: the rule watches and lets it through. That's why it's best to use a key that does nothing there, like F8 or Mouse 5. If you don't want it to get through, check the small box next to the key in the start step: when that key starts the macro, the game doesn't get it; pressed for anything else, it reaches the game as usual. Nothing starts inside Macro Hub.
It works key by key, controller buttons included: in “press X, then hold O” you can keep just O out. If the key is in a step that isn't the last, in a “Hold”, “Short tap” or “Double tap” step, in a step with all its keys checked, or is a trigger, it's decided as soon as you press it: it stays out even if the macro then doesn't start (the editor says so under the rule). Ctrl, Alt, Shift, Windows, Menu, the left click and the sticks always reach the game. For controller buttons you need the virtual controller on, and the game mustn't see the real controller (hide it in Devices).
Macro Hub the macro starts1Macro Hub- Press the start key: the macro starts…
- …and the key reaches the game too.
- Inside Macro Hub, nothing starts.
- Check the small box next to F8: the macro starts and the game doesn't get F8.
One macro at a time
While a macro is running, another macro's key doesn't stop it and doesn't start a second one. With “Once”, pressing the key again while it runs doesn't restart it.
Multi-step rules Pro feature
With Pro, the start becomes a rule: steps one after another, each with its own timing.
- Each step has an action: “Press”, “Hold” for at least a set time, “Short tap”, “Double tap” or “Release”.
- Between one step and the next there's “then”: with no limit, or “within” a set time. “+ Add step” adds another one.
- “Only if”: a key you're holding, or not holding, when the rule completes.
- “Otherwise”: if the rule starts but doesn't finish, for example because a step came too late, another macro runs once.
- Controller buttons, sticks and triggers too, mixed with keyboard and mouse.
- Step 1: hold Mouse 5 for at least 200 ms.
- Then, within 500 ms, press W twice.
- Only if you don't hold Right click.
- All correct: the macro starts.
- W comes too late? The “Otherwise” macro starts.
A start chosen by someone else
A macro downloaded from the Community or imported may come with a start chosen by whoever made it. The first time you turn it on, Macro Hub shows you “Start chosen by the author”: “Turn on” if you're fine with it, “Change start” to choose another one. If you change it in the editor, it becomes yours.
The emergency stop
Ctrl + Alt + Esc stops everything and releases every key, always.
Stop everything
If a macro does something you don't want, press Ctrl + Alt + Esc: every macro stops and all keys are released, in any program, even if the macro is holding something down. The notice “Emergency stop. Macro stopped and all keys released.” appears.
- “Stop all macros” in the menu of the icon next to the clock does the same.
- The start key of a macro set to “Loop” stops it even if the macro is holding Shift, Ctrl or Alt.
Macro HubMacro running · Ctrl + Alt + Esc stops everything- A looping macro is holding W and Shift down…
- …press Ctrl + Alt + Esc, in any program.
- Every macro stops and all keys are released.
Changing the combination
In Settings, “Safety”, click “Change” and press 2 or 3 keys together. You need at least one of Ctrl, Alt and Win, plus a normal key: for example Ctrl + F12.
- In Settings, “Safety”, press “Change”.
- Hold down 2 or 3 keys together, then let go.
- You need at least one of Ctrl, Alt and Win, plus a normal key.
The guardian
If Macro Hub were closed suddenly (a crash, the antivirus, Task Manager), a small separate guardian releases any keys left held down.
Macro Hub- Macro Hub closes suddenly with a key still down…
- …the separate guardian releases it.
Profiles
Where macros and remappings apply: in any program, or only in your games.
What a profile is
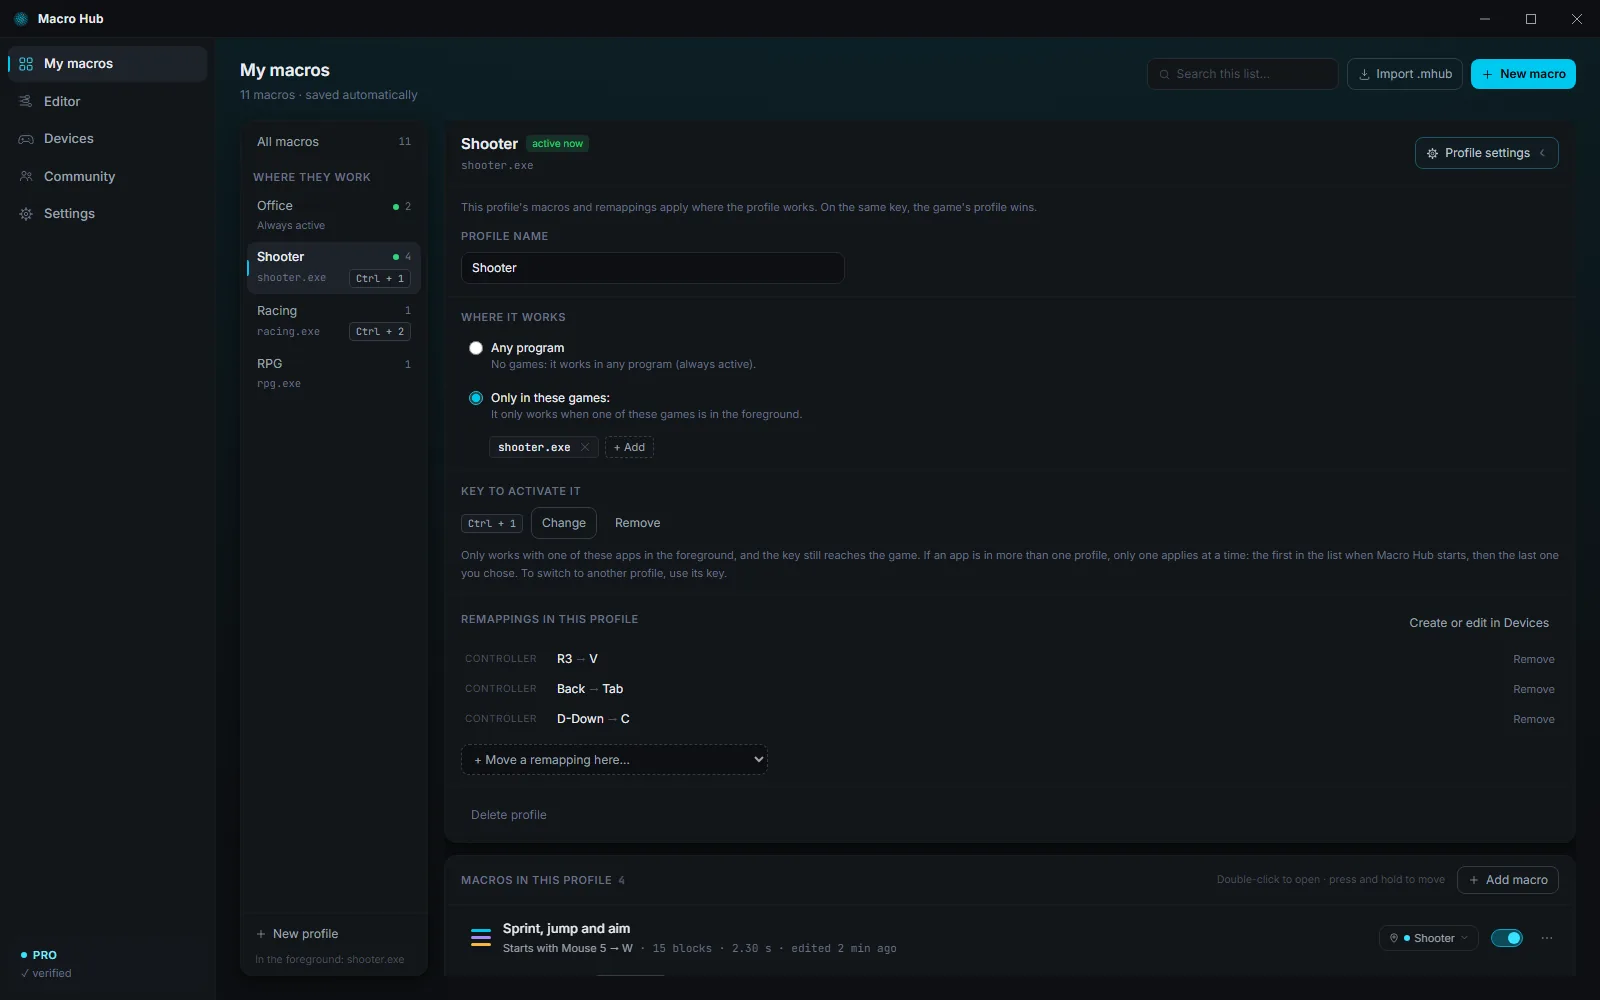
A profile is a place: the macros and remappings you put in it apply wherever the profile applies. There are two kinds, on an equal footing:
- Without games, “Any program”: it's “Always active”, in every program. Several profiles like this can be active at once.
- With games, “Only in these games:”: it turns on by itself when one of its games is in the foreground, and stops applying when you switch to another program.
At any moment, all profiles without games are active, plus the profile of the game in front of you. The green dot in the column shows which ones; at the bottom of the column you can see which program is in the foreground.
Macro HubMacro running · Ctrl + Alt + Esc stops everything- A profile without games: “Office” is always active.
- Bring the game to the foreground: “Shooter” turns on by itself.
- Now Q starts “Quick grenade”, which is in “Shooter”.
- Go back to Notepad: “Shooter” turns off, “Office” stays.
The “Example” profile
At first there's one profile, “Example”, which works in any program. You can rename it, give it games or delete it, just like any other.
Creating a profile
- In My macros, click “New profile”, at the bottom of the column.
- Type the name, for example “Apex” or “Work”.
- In “Where it should work”, choose “Any program” or “Only in these games:”.
- For a game, open it first: you'll find it among the apps under “Open now”. Or type the program name, for example game.exe, and press “Add”.
- Press “Create”.
- “New profile”, at the bottom of the column.
- Type the name.
- “Only in these games:” and choose the game from the open ones.
- “Create”: the profile is ready, with its settings open.
Profile settings
Open a profile and click “Profile settings”: you can change its name, where it works, the key to activate it and its remappings (“+ Move a remapping here…”). At the bottom there's “Delete profile”: macros that were only there move to Not assigned.
On the same key
If two active profiles use the same key, for a macro or a remapping, the game's profile wins. Between two profiles without games, the first one in the list wins.
- Two macros on the same key: one in “Office”, one in “Shooter”.
- In Notepad, F8 starts the one in “Office”.
- In the game, the one in the game's profile wins.
Several profiles for the same game Pro feature
You can make several profiles with the same game, for example one for each character. Only one applies at a time: when Macro Hub opens, the first in the list, then the last one you chose. To switch between them, give each one a “Key to activate it”, for example Ctrl + 1: it only works with the game in the foreground, and it still reaches the game. Or open the profile and press “Use now”.
- The same game in two profiles: only one applies at a time.
- Ctrl + 2 activates “Sniper”…
- …Ctrl + 1 goes back to “Assault”. The key still reaches the game.
In the Free version
In the Free version, profiles without games apply. Those with games stay saved and become active again with a license.
Remapping
A key or button becomes another one, or stops doing anything.
What it's for
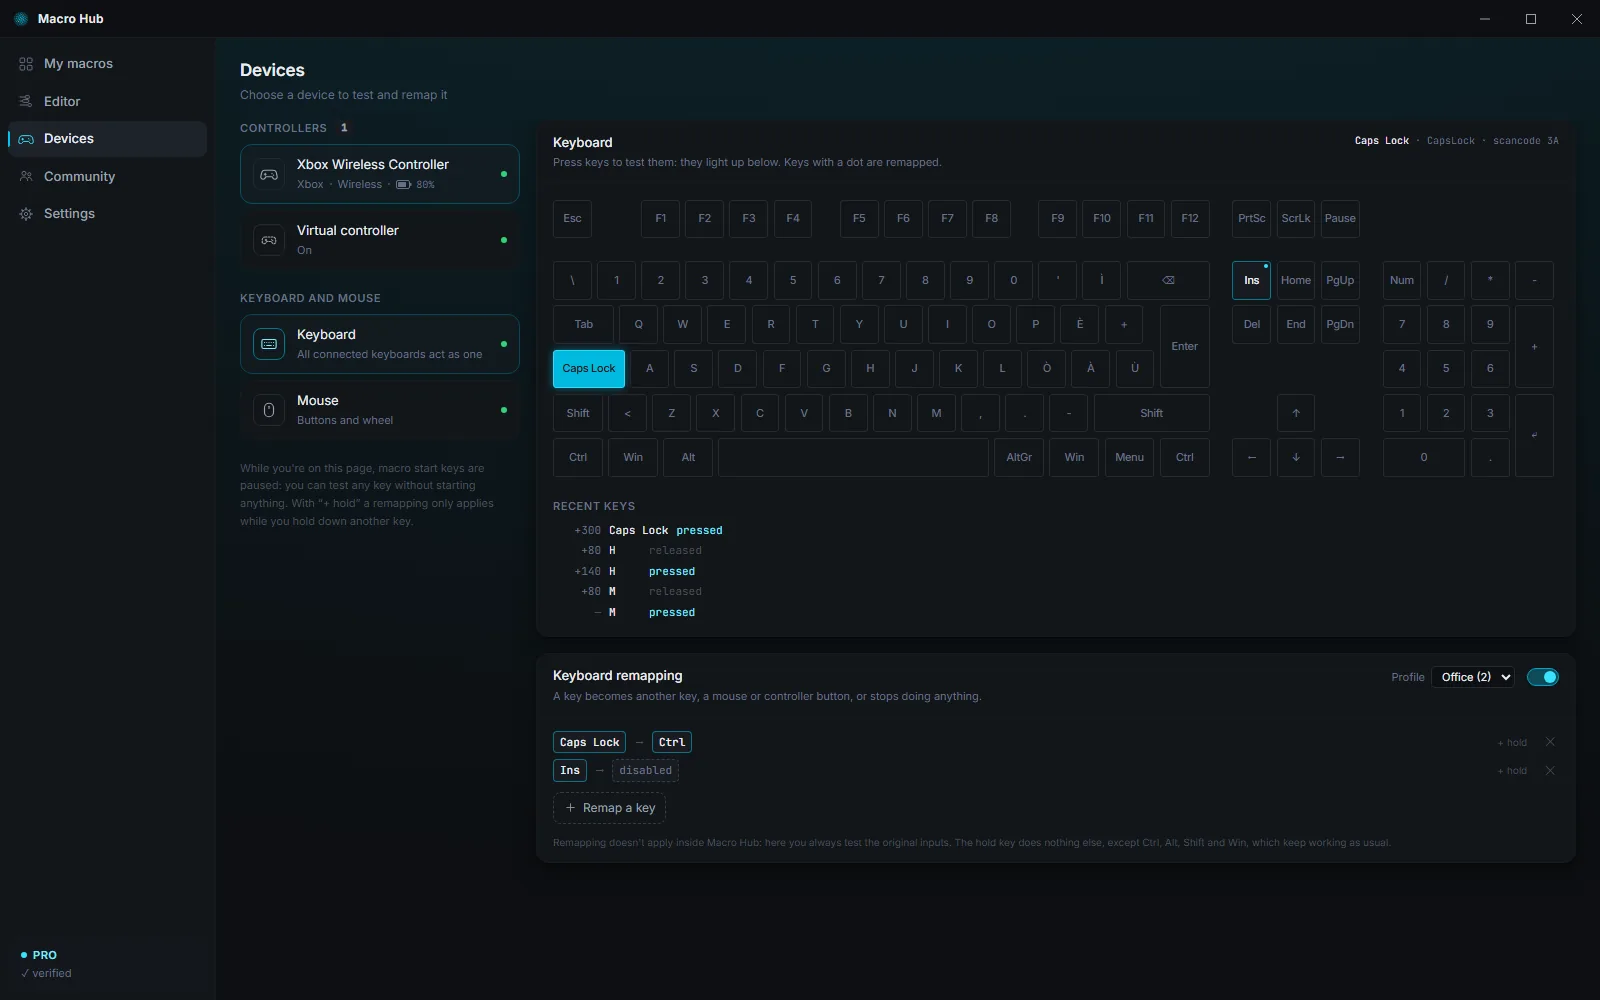
With remapping, one key does another key's job: for example Caps Lock acting as Ctrl, or Mouse 4 pressing F. Or it stops doing anything, like the Win key while you play.
How to do it
- Open “Devices” and choose “Keyboard”, “Mouse” or your controller.
- In the remapping box, at the top right, choose in “Profile” where it should apply.
- Click “Remap a key” and press the key to remap.
- Press the key it should become, or choose another target: a mouse button, “Disable” or, with Pro, a controller button.
- It works right away. The switch next to the profile turns the whole remapping off and on again.
- In Devices, “Keyboard”: click “Remap a key”.
- Press the key to remap: Caps Lock.
- Press the one it should become: Ctrl.
- In your programs, Caps Lock acts as Ctrl. Not inside Macro Hub.
Good to know
- The left click is never remapped: without it, you couldn't use your PC. On the mouse you can remap right, middle, 4 and 5.
- Remappings don't apply inside Macro Hub: there you always test the real keys.
- While you're on the Devices page, macro start keys are paused: you can test any key without starting anything.
- Remappings live in profiles and apply wherever the profile applies.
Layers: while you hold a key Pro feature
With “+ hold”, on a remapping's row, choose a key to hold down: the remapping only applies while you hold it. That way the same key does two things. The hold key does nothing else, except Ctrl, Alt, Shift and Win, which keep working as usual.
- “+ hold” on the row, then the key to hold down.
- E alone stays E.
- While you hold Mouse 5, E becomes G.
The controller Pro feature
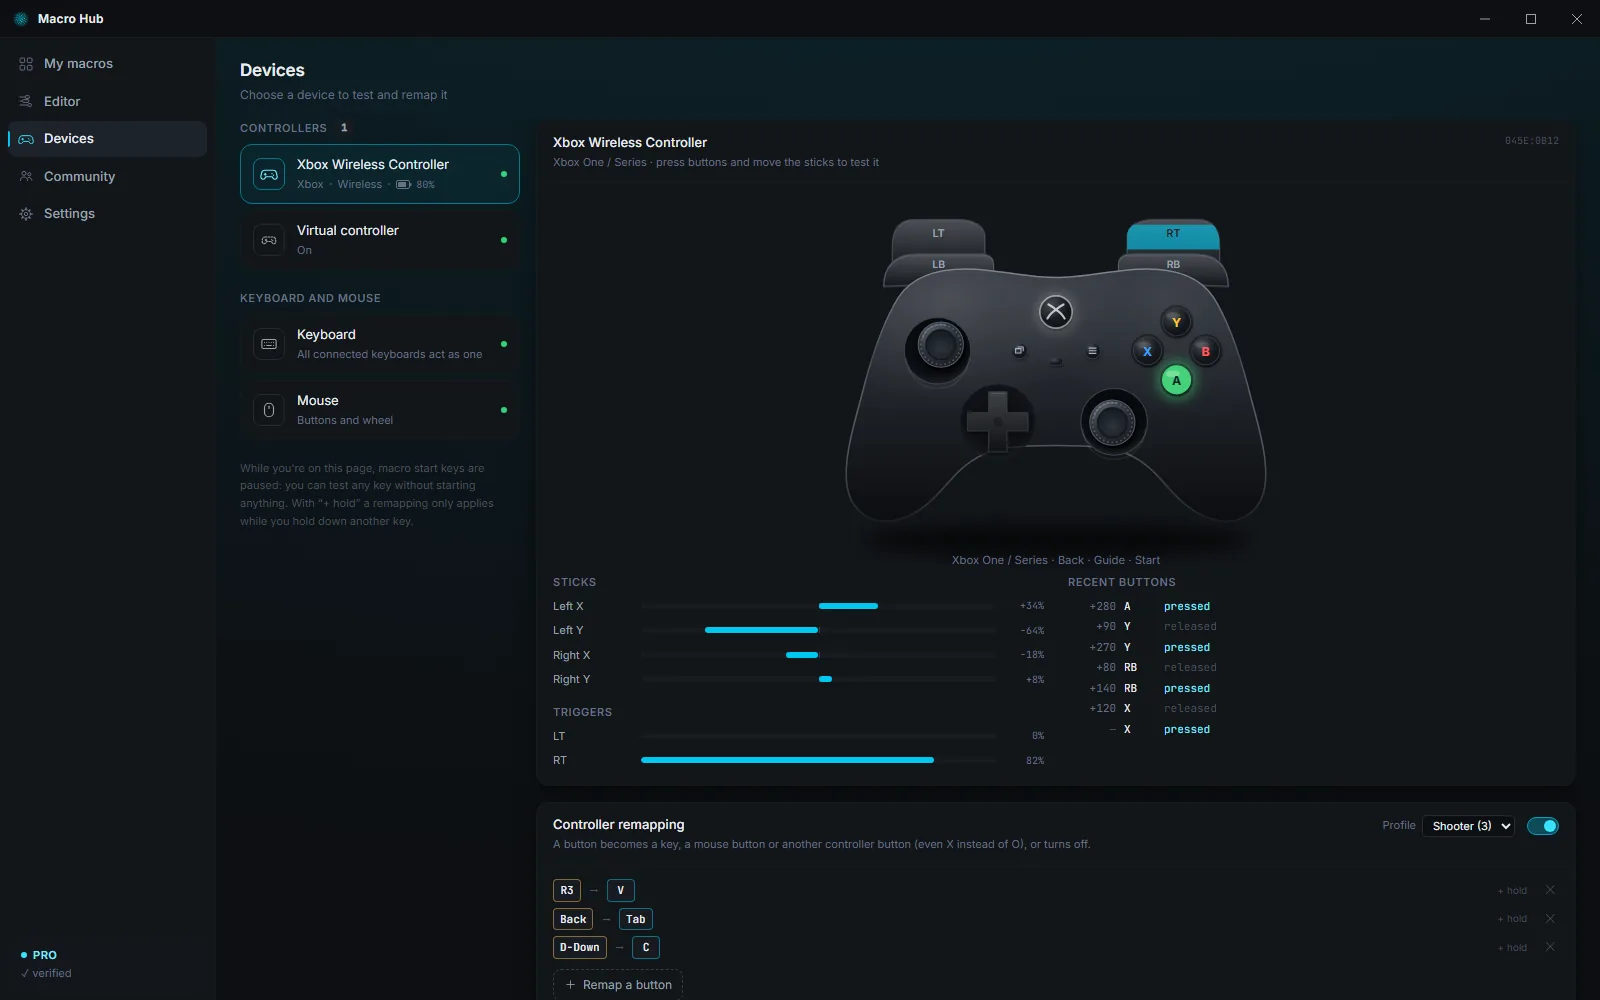
A controller button becomes a key, a mouse button or another controller button (even X instead of O), or turns off. For the game to receive the new button instead of the real one, you need the virtual controller on: without it, the game also receives the original.
Controllers and the virtual controller
Test your devices live and use a virtual controller that games see as real.
The Devices page
On the left are the connected controllers, the “Virtual controller”, the “Keyboard” and the “Mouse”. Choose one: on the right you test it live, and below is its remapping.
- Keyboard: press keys and they light up on the drawing; the ones with a dot are remapped. In “Recent keys” you also see the milliseconds between one key and the next.
- Mouse: click and use the wheel inside the box.
- Controller, with Pro: buttons, sticks and triggers, live.
- Press the buttons: they light up on the drawing.
- Sticks and triggers move live.
- “Recent buttons”: with the milliseconds between one and the next, too.
Your controller
Connect the controller via USB or Bluetooth: Macro Hub recognizes it by itself, no drivers needed. Xbox, PlayStation, Switch, 8BitDo and many more. With Pro you test it, remap it and use it to start macros.
The virtual controller Pro feature
It's an Xbox 360 or PlayStation 4 controller that games see as real. It mirrors your controller with the remappings already applied and receives the buttons pressed by macros: that's why controller blocks in macros only work while it's on.
- “Type”: Xbox 360 works with all PC games; PlayStation 4 shows ✕ ○ □ △ in games that support it, and some games only see it with Steam open.
- “Stick dead zone”: below that tilt the stick counts as zero and drift disappears. Leave the stick still: Macro Hub measures the drift and suggests a “recommended” value; “Use” applies it.
- “Controller to mirror”: if you have more than one connected, which one to mirror.
Macro Hub- Your controller goes through Macro Hub, already remapped…
- …and the game receives it from the virtual controller, together with the macros' buttons.
- With HidHide the game only sees the virtual one.
- The stick moves a little on its own: that's drift.
- Inside the dead zone it counts as zero: the drift disappears.
- Outside it, the movement picks up smoothly, without jumps.
The drivers: “Install drivers” Pro feature
The virtual controller uses two free drivers by Nefarius, already included in Macro Hub:
- ViGEmBus creates the virtual controller. Required.
- HidHide hides the real controller from games, so they don't receive every button twice. Optional.
Choose “Virtual controller” and click “Install drivers”: Windows asks for administrator permission, once per driver, showing their author, Nefarius. Sometimes you need to restart your PC to finish: the app tells you.
ViGEmBus
Nefarius
HidHide
Nefarius
- In Devices, “Virtual controller”: click “Install drivers”.
- Windows asks for permission, once per driver: the author is Nefarius.
- Drivers installed: turn on the virtual controller.
Hiding the real controller Pro feature
With HidHide installed, “Hide the real controller from games” makes games see only the virtual one. It only applies while the virtual controller is on: when you turn it off, or close Macro Hub, the real one becomes visible again. If it was already connected when you installed HidHide, disconnect it and connect it again.
- HidHide can't always hide Xbox controllers: if the game sees two controllers, choose the virtual one in the game's settings, usually number 2.
- A controller no longer shows up in other programs? “Restore controllers” undoes everything Macro Hub changed in HidHide.
Anti-recoil
A block that pulls the crosshair down while you shoot, with the strength you choose, weapon by weapon.
What it is
Anti-recoil is a block on the timeline. For its whole length it pulls the crosshair down, and sideways if you like, to keep recoil in check. These are just programmed movements: Macro Hub doesn't look at the game, except for the weapon box if you choose automatic recognition.
It only moves in the window where it started: it stops with the macro, when you switch windows or profiles, and it doesn't move anything inside Macro Hub.
Putting it in a macro
- In the editor, drag “Anti-recoil” from the palette onto the timeline, as long as a burst of fire.
- Its page opens, under “Editor” in the menu. You can get back to it by double-clicking the block or with “Open settings” in Properties.
- In the “Start” tab choose the left click, or Mouse 4, with “While held”: anti-recoil works while you shoot.
- Put the macro in the game's profile and turn it on.
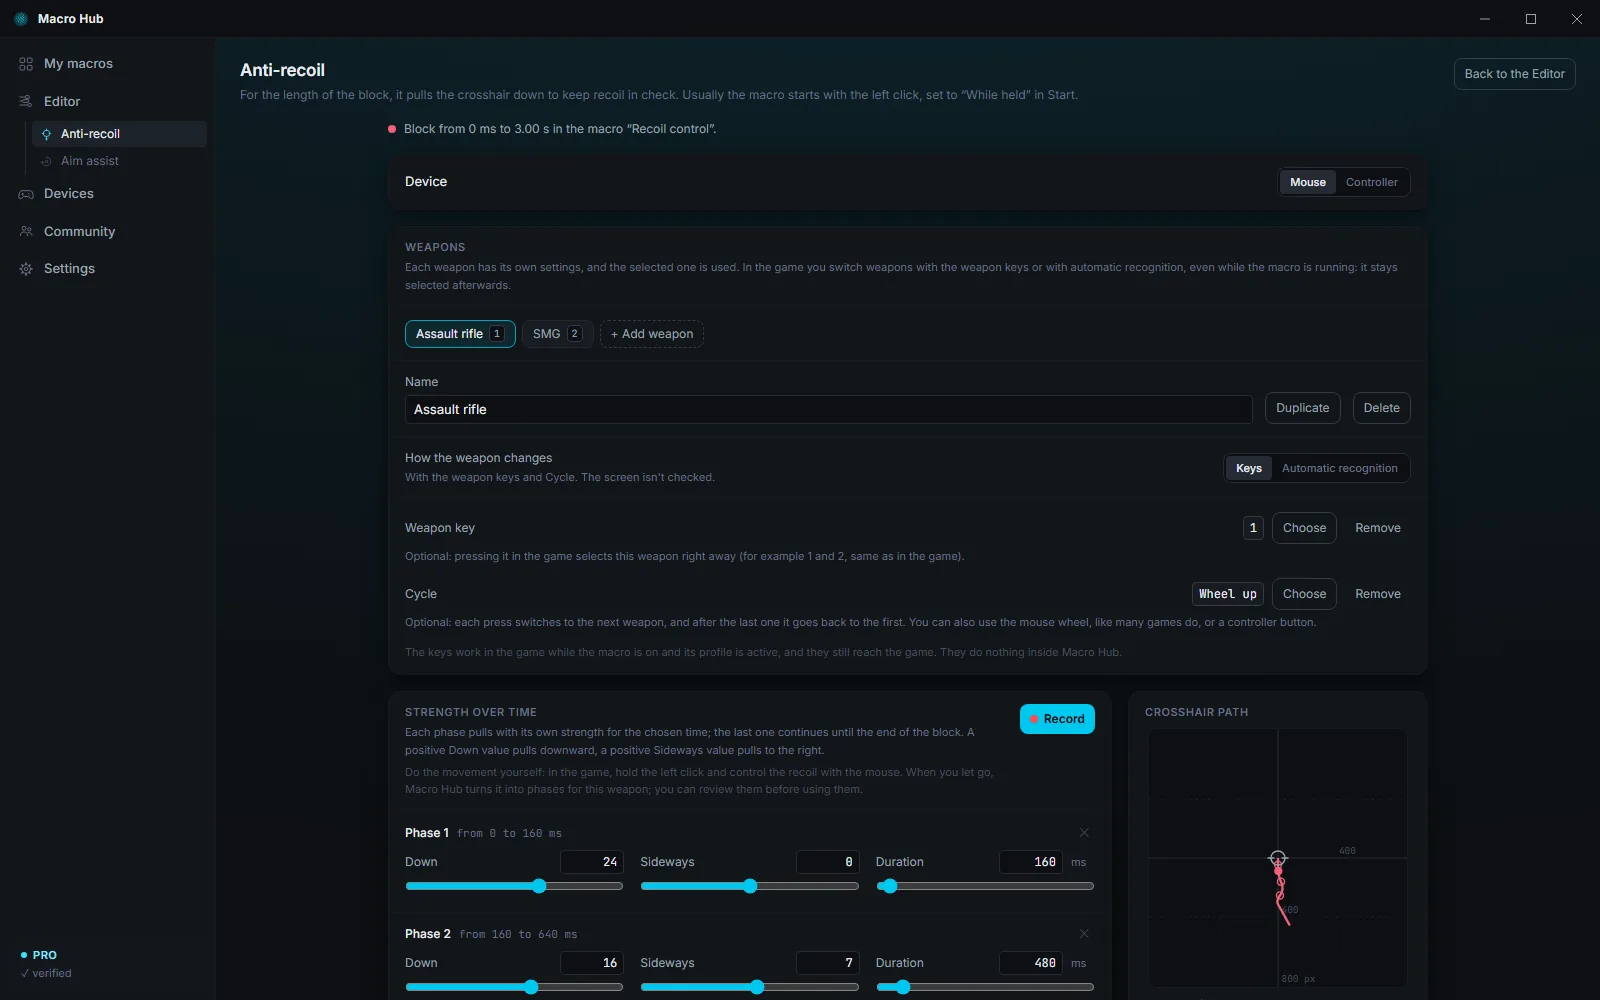
“Device” chooses where it works: “Mouse”, or “Controller”, on the virtual controller's right stick, adding to your own movement.
Strength over time: the phases
In “Strength over time” each phase pulls with its own strength for the chosen time: “Down” (positive pulls downward), “Sideways” (positive pulls to the right) and “Duration”. The last phase continues until the end of the block. “Add phase” adds another one, up to 6; “Smooth transition between phases” moves gradually from one strength to the next.
- “Crosshair path”, on the right, draws where the crosshair would go if you didn't move the mouse.
- “Sensitivity” multiplies all strengths: raise it if you use a low in-game sensitivity.
- With Pro, “Randomness” varies the strength slightly on its own, so the movement looks like it's done by hand.
- Without anti-recoil, the crosshair rises as you shoot.
- With anti-recoil, phase after phase, Macro Hub pulls it down.
- The crosshair stays where it was. Stop shooting: it stops.
Weapons Pro feature
Each weapon has its own phases and settings, and the selected one is used. “Add weapon”, “Duplicate” and “Delete” manage them, up to 20 weapons. In “How the weapon changes” choose how you switch from one to another in the game:
- “Keys”: each weapon can have its own “Weapon key”, for example 1 and 2 as in the game, and “Cycle” switches to the next weapon on each press; the mouse wheel works too. The keys still reach the game.
- “Automatic recognition”: Macro Hub recognizes the weapon on screen (see below).
The selected weapon stays selected afterwards, and it changes even while the macro is running. The keys work in the game while the macro is on and its profile is active.
- Each weapon has its own phases.
- Press 2 in the game: the “SMG” is used.
- The wheel, chosen as “Cycle”, switches to the next weapon.
- The game gets the key too: the weapon changes there as well.
Record your own movement Pro feature
- In “Strength over time”, press “Record”.
- Go to the game, hold the left click and control the recoil with the mouse, the way you normally would.
- Let go of the click: Macro Hub turns the movement into the weapon's phases and shows you “Your movement” next to “The phases”.
- “Use” puts them in the weapon, “Redo” tries again, “Cancel” leaves everything as it was. Esc cancels the recording.
- Press “Record” and go to the game.
- Hold fire and control the recoil with the mouse.
- Let go: Macro Hub turns it into phases.
- “Use” puts them in the weapon.
Screen recognition Pro feature
Choose “Automatic recognition” in “How the weapon changes”. Then, for each weapon:
- “Recognize from screen”: go to the game with that weapon equipped, and the screenshot is taken after a countdown or with the key you chose. Or “Load an image”: a saved full-screen screenshot.
- Drag a box around the weapon's icon or name, tight but containing all of it, and press “Save”.
While the macro is on, Macro Hub only looks at that box, a few times per second, and selects the weapon it recognizes. “Threshold” sets how closely it must match, “Rate” how many times per second it looks, and the “Keys that trigger an immediate check” make it look as soon as you switch weapons. “Test now” shows you the scores live. You need at least two weapons, one with a crop.
- Take a screenshot of the game with the weapon equipped.
- Draw a box around the weapon icon and press “Save”.
- Do the same for each weapon.
- Switch weapons in the game: Macro Hub recognizes it by itself.
Rapid fire Pro feature
For each weapon you can turn on “Rapid fire”: while the block is running, usually while you hold the left click, Macro Hub releases and presses fire again by itself, in rhythm. Choose the “Shots per second” and the “Hold time” of each shot; if the game misses some shots, raise it. Anti-recoil keeps working at the same time.
- Hold fire…
- …Macro Hub releases and presses it again by itself, in rhythm.
- Choose the shots per second and the hold time.
Free and Pro
In the Free version, anti-recoil works with the mouse and the first weapon, without randomness or rapid fire. With Pro: controller, more weapons with keys to switch between them, randomness, rapid fire, recording and screen recognition.
Aim assist Pro feature
A block that makes the crosshair trace a small repeating shape.
What it is
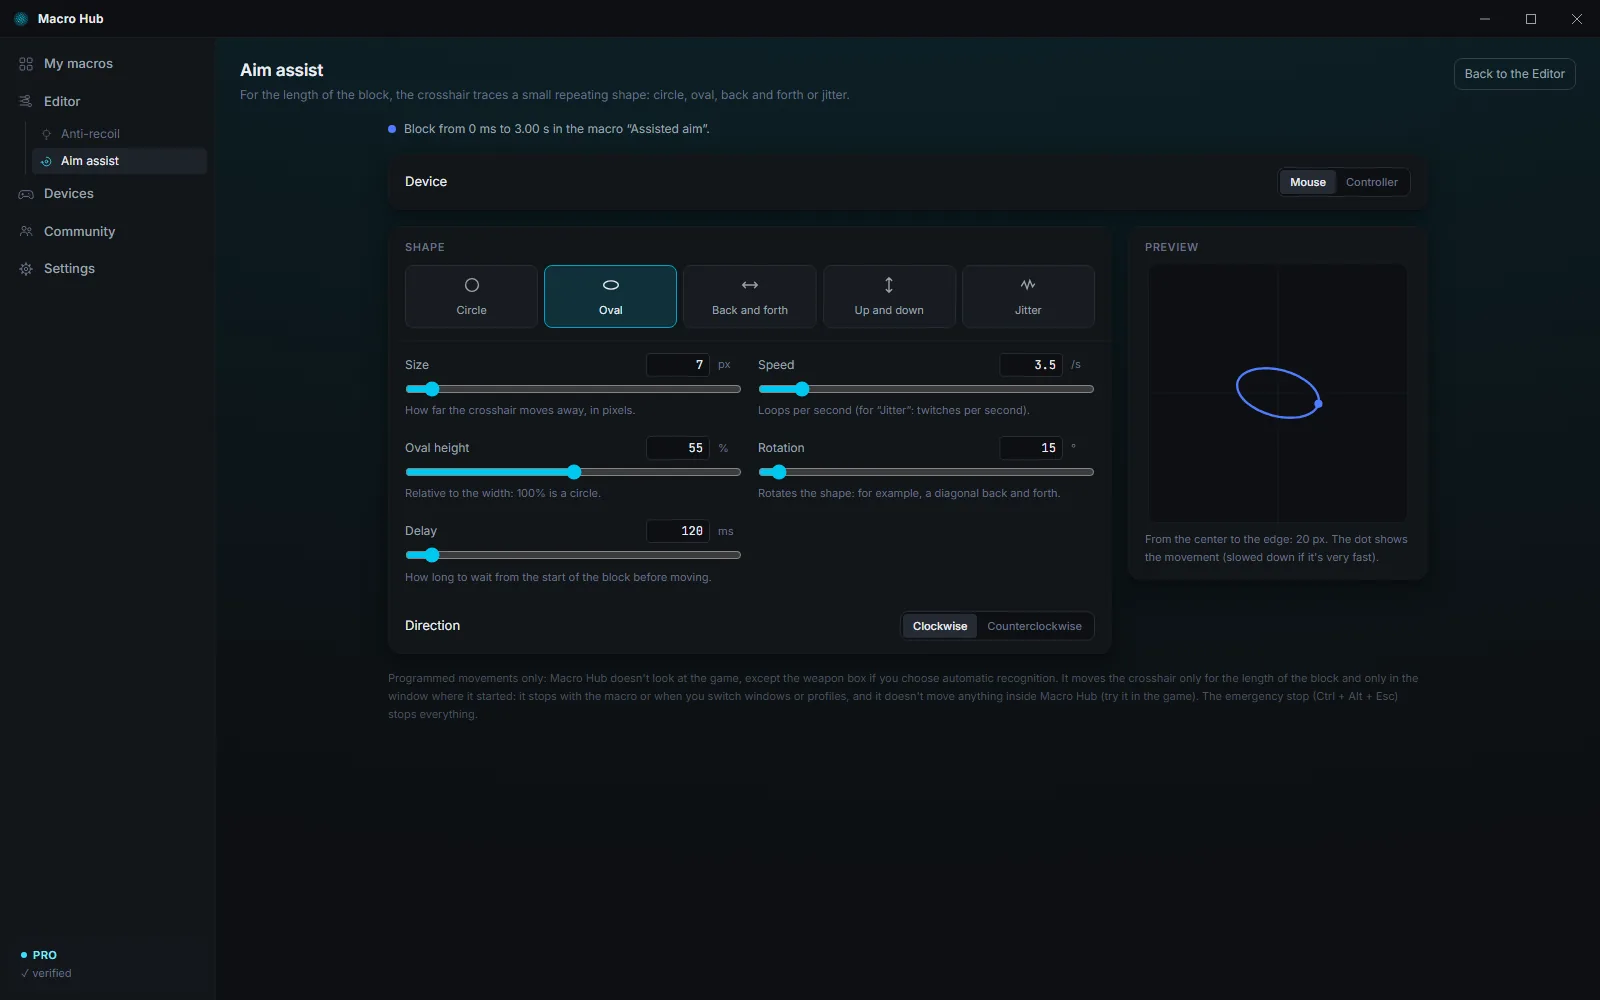
For the length of the block, the crosshair traces a small repeating shape. These are just programmed movements: Macro Hub doesn't look at the game. Usually the macro starts with the right click, with “While held”: the shape works while you aim. Drag “Aim assist” from the palette onto the timeline and its page opens.
Shape and settings
- “Shape”: “Circle”, “Oval”, “Back and forth”, “Up and down” or “Jitter”.
- “Size”: how far the crosshair moves away, in pixels with the mouse, as a percentage of the stick with the controller.
- “Oval height”: relative to the width; 100% is a circle.
- “Speed”: loops per second; for “Jitter”, twitches per second.
- “Rotation”: rotates the shape, for example a diagonal back and forth.
- “Delay”: how long to wait from the start of the block before moving.
- “Direction”: “Clockwise” or “Counterclockwise”.
“Preview”, on the right, shows the movement, slowed down if it's very fast. With “Controller” it works on the virtual controller's right stick, adding to your own movement.
- “Circle”: the crosshair circles around the point.
- “Oval”: you also choose how tall it is.
- “Back and forth”, and with “Rotation” diagonally too.
- “Up and down”.
- “Jitter”: small twitches, many per second.
- Hold the right click: after the delay, the shape starts.
- Let go of the click: the movement stops.
Free and Pro
Aim assist is a Pro feature: in the Free version the block stays in the macro but doesn't run.
Community
Download other people's macros, try them, turn them on; publish your own.
Finding a macro
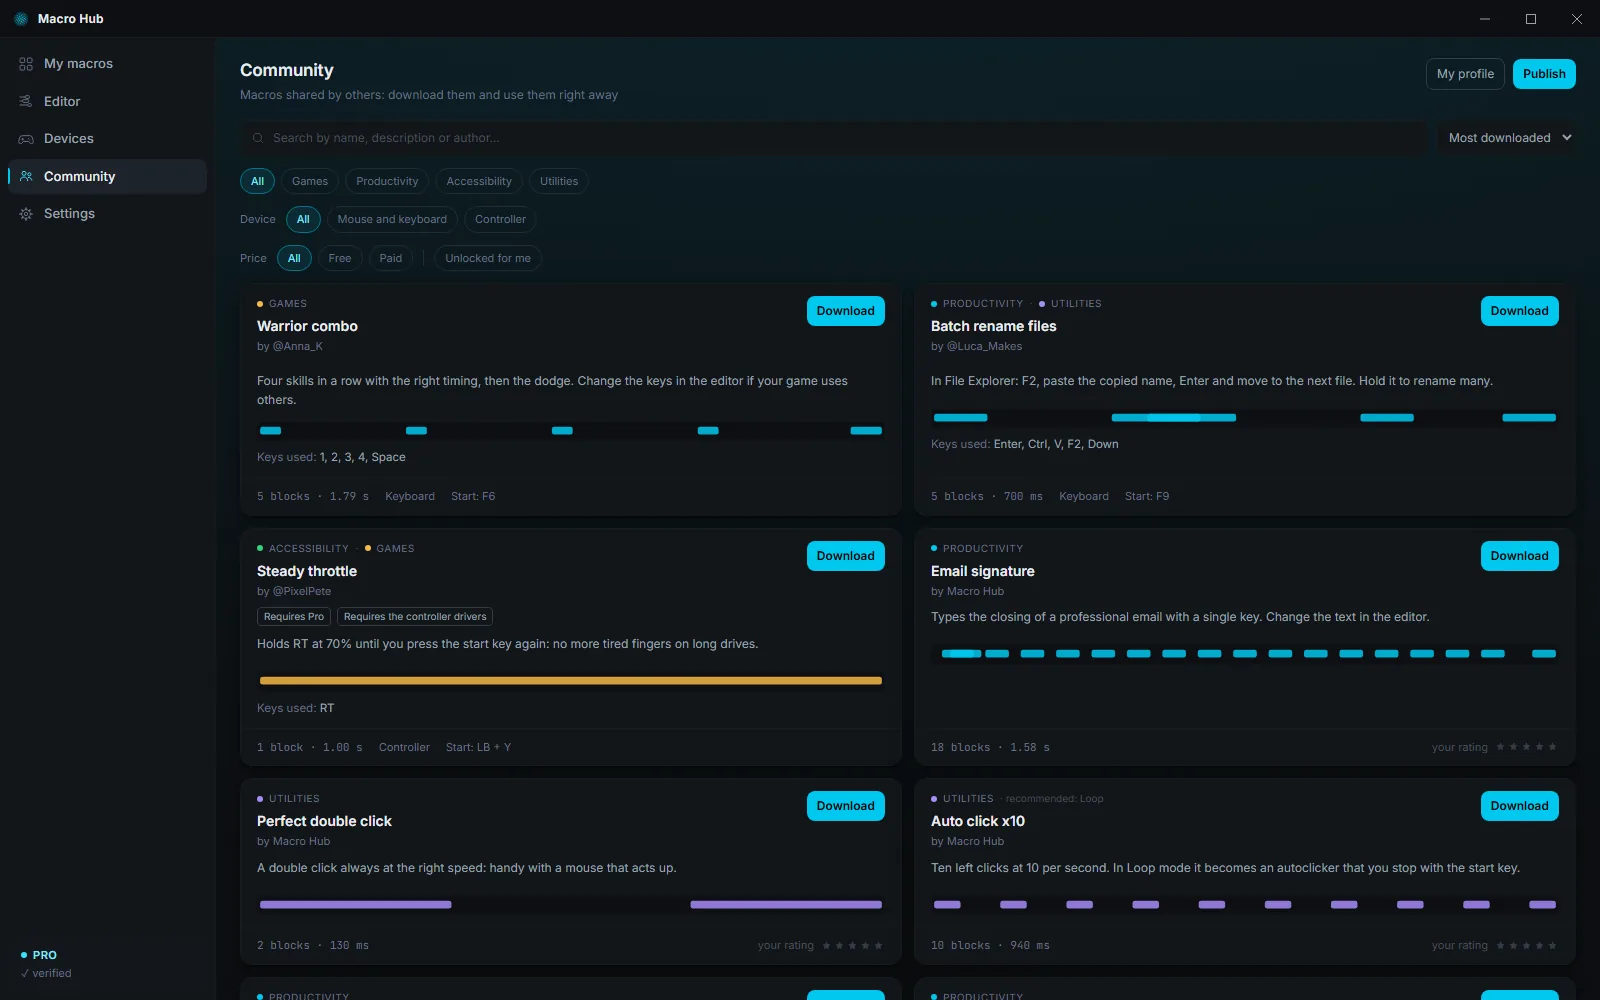
On the “Community” page you search by name, description or author, and filter by category (“Games”, “Productivity”, “Accessibility”, “Utilities”), by “Device” and by “Price”. “Sort” puts the “Most downloaded”, the ones “Rated by you” or the “Newest” first. You can give the examples 1 to 5 stars (“your rating”): they stay on this PC, and “Rated by you” sorts by them.
- Each card tells you what the macro does, who made it, the “Keys used:”, how many blocks it has, how long it lasts, which devices it uses and how it starts. The bars show the blocks over time.
- “Requires Pro” and “Requires the controller drivers” tell you what's needed.
- The red warnings tell you if the macro “Types text”, “Uses system keys (Windows)” or “Contains anti-recoil or aim assist”.
- The examples “by Macro Hub” are always there, even without internet.
- Choose a category…
- …and the device: the right macros remain.
- Each card shows the keys used, the length and the start.
Download, try, turn on
- Press “Download”. The macro goes to My macros, off and not assigned: it doesn't start until you decide.
- The card's button becomes “Open”: it opens the macro in the editor. Look at the blocks and try it with “Run”.
- Choose “Where it works” and turn it on in the profile.
- If the author chose the start, Macro Hub shows it to you the first time you turn it on: “Turn on” or “Change start”. If there are warnings, you read them first and choose “Turn on anyway”.
Macros published by others never press the Windows or Menu key and don't open Start or Task Manager: everything else works normally.
Macro Hub“Warrior combo” will start with:
- In the Community, press “Download”.
- The macro arrives in My macros: off and not assigned.
- Choose where it works and turn it on.
- Macro Hub shows you the start chosen by the author.
- “Turn on” if you're fine with it, or “Change start”.
Publishing your own macro
Press “Publish”. The first time, Macro Hub asks you a few things, one step at a time:
- Your author name: 3 to 20 characters, letters without accents, digits, _ and -. It will be public and you can't change it: don't use your full name.
- The Community rules: read them and press “I accept the rules”.
- The recovery code, to keep somewhere safe.
- The macro: title, description, 1 to 4 categories, the included start and the price.
Press “Publish”: the macro is in the Community. No email or password needed, just your Macro Hub Code. Once published, the content can't be changed: to fix it, publish a new one.
- The rules, in short: no cheats for online games, only finished macros you made yourself, no links in the text; payments are between seller and buyer.
- A newly created Macro Hub Code can publish after a few hours. You can publish at most 10 macros a week and 50 in total.
- A macro downloaded from the Community can't be published again.
- Your author name: public, forever.
- The Community rules.
- The recovery code, kept safe.
- Title, description and categories, then “Publish”.
My profile
After your first listing, “My profile” shows “My listings”: “Edit” changes the texts and categories (and, for paid ones, the price and contact), “Remove from the Community” takes it out of the catalog. Anyone who already downloaded it can keep using it.
Paid macros
Only sellers approved by Macro Hub can sell them; publishing for free is open to everyone. The seller sets the price, and payment happens outside Macro Hub. To buy one:
- On the card, press “How to get it”.
- Copy your Macro Hub Code and send it to the seller, together with the payment, the way they tell you.
- The seller unlocks it for your code. Press “Check again”: once it's unlocked, press “Download”.
A purchased macro unlocks only on this PC and is copy-protected: you can use it, but you can't see its blocks or export it. You can change how it starts and, if it has anti-recoil or aim assist, the device, weapon names and keys, how the weapon changes, sensitivity, randomness and rapid fire.
- Paid macro: press “How to get it”.
- Copy your Macro Hub Code and send it to the seller, with the payment.
- The seller unlocks it for your code.
- “Check again”, then “Download”.
Settings
Language, license, safety, starting with Windows, version and your code.
From top to bottom
- “Language”: 8 languages. It applies to the whole app and to the menu next to the clock. Macro Hub starts in your Windows language.
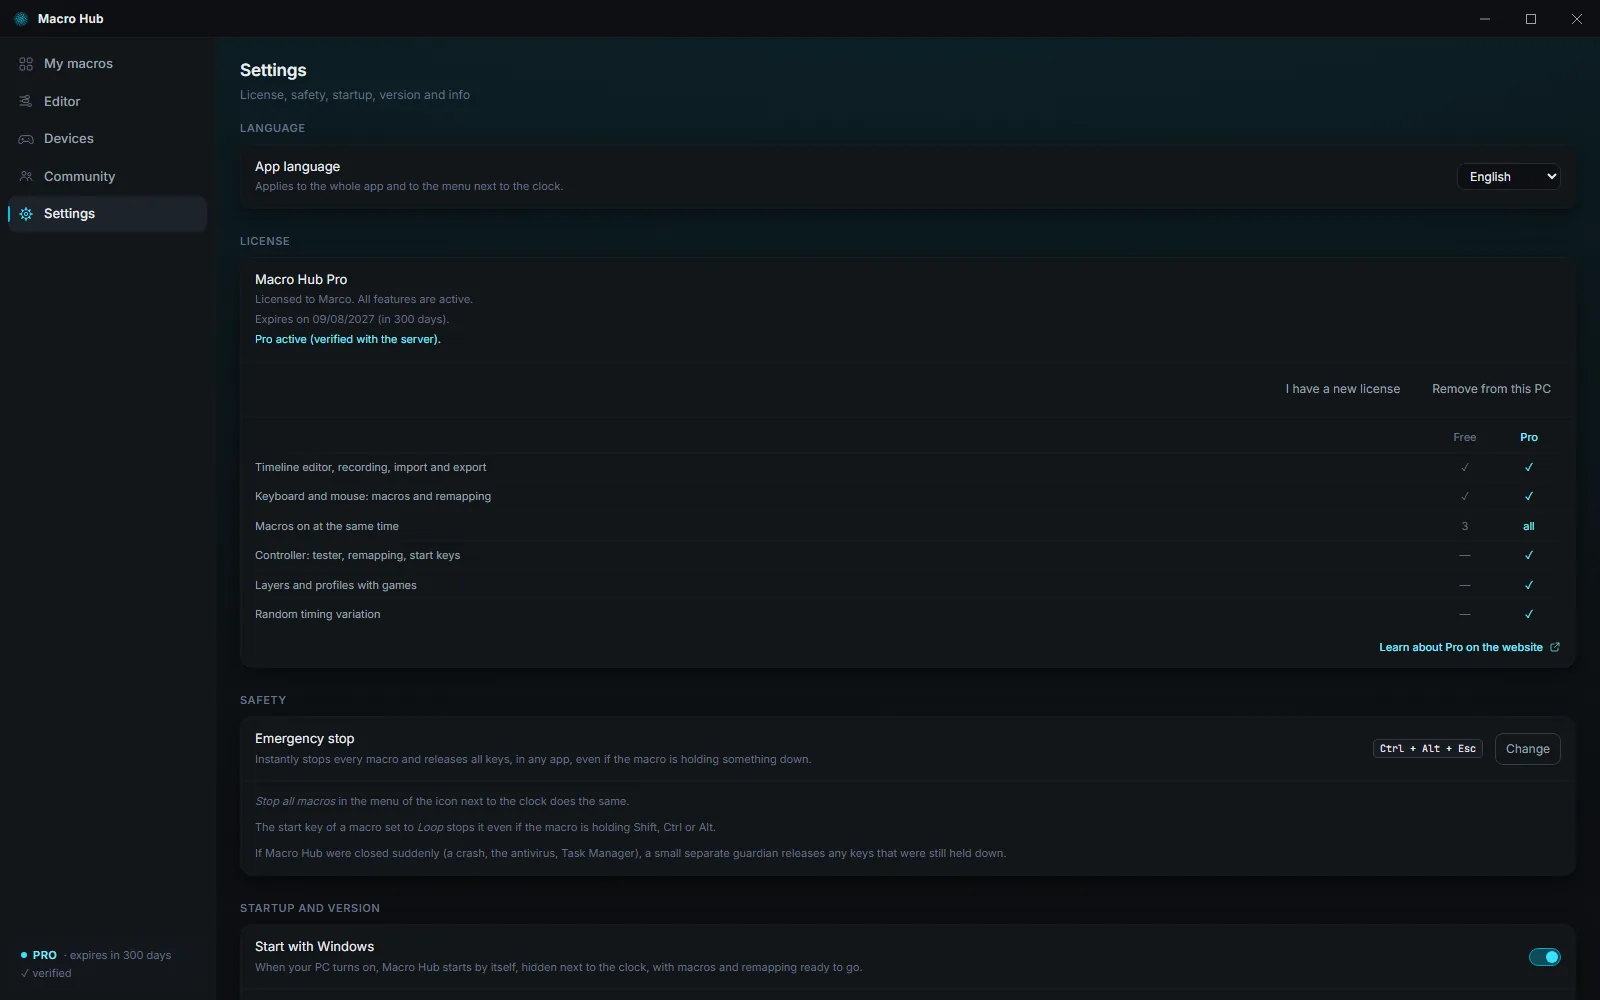
- “License”: your version, how long it's valid and the field for the Pro key. Below, what's in Free and in Pro.
- “Safety”: the emergency stop and its combination.
- “Startup and version”: “Start with Windows”, updates and versions.
- “About”: your Macro Hub Code with “Copy”, the recovery code, “Replay the tour” and the third-party licenses.
Macro Hub12:00- Settings, “App language”.
- Choose the language: the whole app changes right away.
- The menu next to the clock too.
Start with Windows
When it's on, Macro Hub starts by itself when your PC turns on, hidden next to the clock, with macros and remapping ready to go.
12:00- Turn on “Start with Windows”.
- When your PC turns on, Macro Hub starts by itself…
- …hidden next to the clock, with macros and remapping ready to go.
The recovery code
With the recovery code you get your Macro Hub Code back, along with your Pro license, your listings and the macros you bought, even after reinstalling Windows or on a new PC.
- In Settings, “About”, press “Show” next to “Recovery code”.
- “Save as file” saves it to a text file; or copy it and write it down somewhere safe. Then check “I saved it somewhere safe”.
- On the new PC, press “Use the recovery code”, paste the code (it starts with MHR) and press “Use the code”, then “Yes, use it on this PC”.
The old PC is deactivated: the code works on one PC at a time. Anyone who knows the recovery code can pretend to be you: don't give it to anyone. Bring your other macros over with .mhub files.
- “Show” the recovery code.
- “Save as file” and keep it safe.
- On the new PC: “Use the recovery code”.
- Code, Pro and purchased macros move there. The old PC is deactivated.
Updates and versions
Macro Hub checks by itself every time it opens and never installs anything without asking you.
The update window
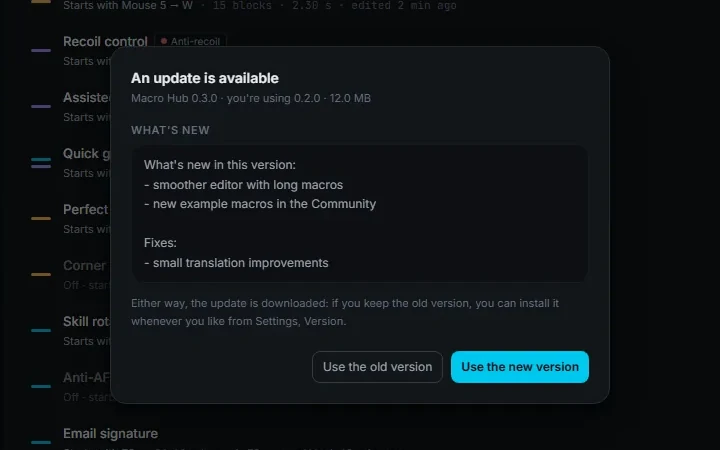
Every time it opens, Macro Hub checks whether there's a new version. If there is, “An update is available” appears, with “What's new” and two buttons:
- “Use the new version”: downloads the update and installs it right away. Macro Hub closes and reopens by itself.
- “Use the old version”: you keep using the current one. The update is downloaded anyway, and you can install it whenever you like from Settings, “Version”.
The window appears once per version, and only when the app is free: not over the tour or another window, not while you're recording and not while a macro is running.
Macro Hub- smoother editor with long macros
- new example macros in the Community 1
Either way, the update is downloaded: if you keep the old version, you can install it whenever you like from Settings, Version.
Starting the update: Macro Hub will close and reopen by itself…- On opening: “An update is available”, with what's new.
- “Use the new version”: it downloads, and Macro Hub reopens updated.
- “Use the old version”: it downloads anyway…
- …and you install it whenever you like from Settings, “Version”.
In Settings
In “Startup and version”, the “Updates” row tells you how the last check went: “Check now” runs it again, “Update now” installs a version that's already downloaded.
Version: forward and back
“Version” lists the one “in use”, the new ones to install and the previous ones you downloaded, with their dates. Choose one to read what's new in it, then “Install”: Macro Hub closes and installs it. Your macros are kept.
- “Version” lists the one in use, the new ones and the previous ones.
- Choose one: read what's new in it.
- “Install”: Macro Hub closes and installs it. Your macros are kept.
Signed twice
Every version carries two Macro Hub signatures, and before installing it Macro Hub checks both of them again: without them, it won't install.
Required update
Only in rare emergencies does a version become required: “Update required” appears, and Macro Hub works again after “Update now”. Your macros and settings are kept. “Close Macro Hub” closes the app.
Free, the free trial and Pro
What's in Free, how the trial works and how to activate Pro.
The Free version
Free of charge, and it never expires:
- keyboard and mouse macros, as many as you like, with the editor and recording;
- 3 macros on at the same time, in profiles without games;
- start with a key or a keyboard and mouse combination;
- keyboard and mouse remapping, profiles for any program;
- anti-recoil with the mouse, with one weapon;
- Community, examples, updates, emergency stop. It works without internet too.
The 3-macro limit
In Free, the macros that count are the ones on in at least one profile without games. If you try to turn on a fourth, Macro Hub tells you to turn one off. If you have more on, for example after the trial, the 3 you turned on or edited most recently are the ones that work.
Macro Hub- In Free: 3 macros on at the same time, in profiles without games.
- The fourth won't turn on: Macro Hub tells you.
- Turn one off, and turn on the one you need.
The Pro version
Pro adds everything else: all macros on at the same time, profiles with games and layers, multi-step start rules, the controller (testing, remapping, starting macros) and the virtual controller, random timing variation, anti-recoil with the controller and up to 20 weapons, with randomness, rapid fire, recording and screen recognition, and aim assist.
The free trial
7 days with every Pro feature. It starts by itself on the first launch with internet, with nothing to enter. It's tracked by the server, one per PC. In the box at the bottom left you can see how many days are left.
Activating Pro
- Write to X: you'll receive your license key.
- In Macro Hub, open Settings, “License”.
- Paste the key and press “Activate”. You need internet.
The license lasts one year from its first activation and is tied to your Macro Hub Code: no one else can use it. Bought another year before it expires? “I have a new license”: your remaining days are added on.
Macro Hub- Settings, “License”: paste the key you received.
- Press “Activate”: Macro Hub checks it with the server.
- Done: every Pro feature, for a year.
Pro with internet, Free without
Trial and Pro apply once the server responds, and Macro Hub asks it every time you open the app. Without a connection you use Free; as soon as the connection comes back, Pro unlocks by itself, without restarting. If the network drops later, Pro stays until you close the app. “Check now”, under License, runs the check again.
Macro HubMacro Hub- On opening, Macro Hub asks the server: with the response, Pro.
- Without internet you use Free.
- The connection comes back: Pro unlocks by itself, without restarting.
When it ends
When the trial ends or the license expires, Macro Hub goes back to Free: all your macros stay, and anything that uses Pro features stays saved and comes back with a license. To renew it, write to X: the renewal comes through by itself the next time you open Macro Hub, or right away with “Check now” in Settings, “License”.
If something goes wrong
The most common causes, and what to do.
A macro doesn't start with its key
- Is it assigned? If it's in “Not assigned”, in yellow, choose “Where it works”.
- Is it on in that profile? In the pin button, the dot must be colored.
- Is the profile active? A profile with games only applies with its game in the foreground: look at the green dot in the column.
- Does it have a start? “No start” means it only starts with “Run”. “key unavailable” means that key can't be used, for example because another app already uses it: hold the pointer over the label to find out why, and choose another one.
- Are you on Free? Only 3 macros on and only profiles without games apply.
- Is another one already running? Only one runs at a time.
- Are you inside Macro Hub? Nothing starts there, and on the Devices page start keys are paused.
Macro HubMacro running · Ctrl + Alt + Esc stops everything- The macro is assigned and on…
- …but its profile isn't active: the game isn't in the foreground.
- Bring the game to the foreground: the profile activates and the macro starts.
It works in Notepad but not in the game
If the game runs as administrator and Macro Hub doesn't, Windows doesn't let the keys through: when you try the macro with “Run”, the app tells you. Some games also don't accept keys pressed by a program. And controller blocks only work with the virtual controller on.
A key stays pressed, or the macro won't stop
Press Ctrl + Alt + Esc, or “Stop all macros” next to the clock: every macro stops and all keys are released.
The game doesn't see the virtual controller
In Devices, check that the drivers are installed and the virtual controller is on; if the app asks, restart your PC. If the game was already open, restart it. With the PlayStation 4 type, some games want Steam open: if it doesn't respond, switch back to Xbox 360. Does the game see two controllers? Choose the virtual one in its settings.
Weapon recognition doesn't see anything
If the app says the game can't be captured, try borderless windowed mode. If you changed the resolution, redo the crop. The macro must be on, in the active profile, with at least two weapons, one with a crop.
The trial or Pro won't activate
You need internet when the app opens: until the server responds, Macro Hub uses Free and tries again by itself. In Settings, “Check now” runs the check again.
“Your Macro Hub Code was moved to another PC with the recovery code”
Someone used your recovery code on another PC, maybe you. On this PC, the Pro license, the Community and protected macros no longer work. To bring the code back here, use the recovery code again.
Windows says “Windows protected your PC”
Macro Hub is a new program, and its installer isn't yet signed with a certificate that Windows recognizes. Click “More info” and then “Run anyway”. Only download Macro Hub from macrohub.it.
Macro Hub- Windows may show this notice: Macro Hub is new.
- Click “More info”.
- Then “Run anyway”.
Your antivirus flags Macro Hub
It can happen: to an antivirus, a program that presses keys for you can look suspicious. Only download Macro Hub from macrohub.it. If your antivirus blocks it, write to X.
Didn't find the answer?
Write to X: we'll answer your questions about Macro Hub.
Now it's your turn
Download Macro Hub, open Notepad and start “Ciao” with F8. The rest comes naturally.
Download for freeHave a question? Write to X.